| WORKSHOPS Links:
Painting Flowers - Mandy Southan
Colour Mixing - Mandy Southan
Decorative Effects - Leonard Thompson
Dyeing Devores - Caroline Munns
Silk Choker Necklace - Linda Graves
Wax Melting Pots - Jill Kennedy
Gutta Pro-liners - Isabella Whitworth
Javana Air Pen - Isabella Whitworth
Microwave Dyeing - Vera Dreyfuss
Painting Borders - Tessa Barnes
Ten Top Tips - Jill Kennedy
Transferring designs - Anon
Free-style landscapes - Marianne Nash
Painted Silk Poppy - Mandy Southan
Magic Lettering - Leonard Thompson
Painted Lilies - Mandy Southan
The Silk Road - Mandy Southan
Aspects of Design - Leonard Thompson
Selling your work - Ian Bowers
Japan: Textiles - Mandy Southan
|
|
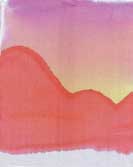
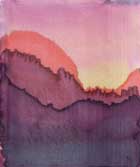
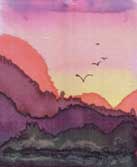
FREE-STYLE LANDSCAPES - Marianne Nash

After pinning the silk out I used steam-fix dyes. If you use iron-fix paints the hairdryer will set the colours between layers, and you may not get the same result.
Paint the first layer over all the silk, using very pale colour or a graded wash, depending on the desired end-result. This layer can be dried with a hairdryer.

The second layer should start about half way down to make the first range of hills, and continue almost to the bottom. A slightly darker colour and possibly slightly different tone should be used. If a lighter area is left at the bottom of the silk this can become a lake or distant river. This layer should be left to dry naturally.
The third layer in a darker colour can then be added. Be sure to vary the slopes of the hills, as it is all too easy to get a range of almost parallel lines. This colour can also be taken amost to the bottom. I then go back along the top edge with more colour to make sure it is quite wet and will spread with a furry edge into the previous colour. Again leave this to dry naturally, unless you see the top edge running too much. Remember that at such a distance the definition of trees and forests will not be very pronounced. To stop it becoming too defined, dry it with a hairdryer.
|
|
Fourth layer - using stronger colours and altering the angle of the hills paint to the bottom. You could leave a streak uncovered and possibly a river will be suggested. Repaint the top edge again to encourage a more pronounced jagged edge. At this stage you could add further colours into the foreground to give more interest and carefully drop in some fine salt to form bushes, or rough land. Again this can be left to dry naturally unless the top edge is becoming too pronounced, when the hairdryer can be used.
If you find you have a large fairly uninteresting foreground, you could carefully add a narrow streak of plain water across the width of the silk, which can give the impressions of a river shrouded in mist.
When the work is dry, a few judiciously placed birds can be drawn into the sky. You can also draw into the lower area with a signature pen to give definition to bush shapes.
Four layers is probably sufficient - the more layers, the darker the colours needed to cover the previous ones.
In your excitement at the beautiful pictures appearing before you, don't forget to fix the colours!
Do not judge your picture until you see it in a card frame - you will be amazed at the difference it makes. If you make the individual paintings larger than the aperture of the card you want to use, you will have room to move the card over the silk and find the most pleasing composition.
|
|
