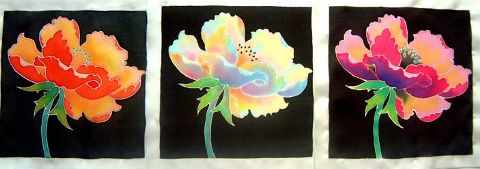
PAINTED SILK POPPY - Mandy Southan
If you have never painted on silk before, you have a treat in store! Silk Painting is easy, rewarding and truly addictive! You do not need lots of expensive equipment to get started and even complete beginners can achieve excellent results very quickly. It is such an exciting medium I am constantly amazed that more painters do not try it as an alternative to more traditional methods. As in oil or watercolour painting, there are lots of different techniques for producing a wide range of effects - wet on wet, wet on dry, overpainting, colour blending and many more.
This project introduces you to one of the basic techniques used in silk painting - Gutta Resist.
Gutta is a water-based gum or, traditionally, a liquid latex rubber, which is applied to the silk
in fine lines.These 'resist' lines form barriers, blocking the fibres of the silk and preventing
colours spreading into each other.
Materials Needed
Marabu Iron - Fix Silk Paints: Medium Yellow, Mid Blue, Carmine Red and Black
Marabu Colourless Water-based Gutta · Silk Habotai · Wooden Frame · 3-point Silk Pins
Watercolour Brush, size 6 · Watercolour Palette · Paper Towelling
2 Jam Jars of Water · 3B pencil · Poppy Design
Silks
Many different silks can be painted. It is best to buy white silk without dressing (the sort suitable for dyeing and printing) from a mail order silk painting supplier or art and craft shop.
A good silk to start with is Silk Habotai No. 5 (light weight) or No. 8 (medium weight). It is inexpensive, easy to paint and readily available.
Wooden Frame
The silk is pinned to a wooden frame to prevent it touching the table surface while it is being painted. You can use an old picture frame or buy a proper, adjustable silk painting or batik frame from an art supplier.Use a frame the size of the silk you want to paint.
3-point Silk Pins
3-point Silk Pins are easier to push into the wooden frame and do not snag the silk. Some people use masking tape- but be careful not to get it wet.
Iron-fix Silk Paints
Silk paints and steam-fix dyes are used for silk painting. They spread freely on the silk and are fixed to make them colour- and wash-fast.The paints used in this project are Iron-fix so are simply fixed by ironing when the painting is finished. A wide range of colours are available which you can dilute to make tints.The colours can be intermixed and blended on the silk too, by pressing the brush firmly onto the silk and 'scrubbing' to and fro, briskly. Blended colours dry on the silk with a beautiful sheen which reflects light and produces results unlike any other medium.
Water-based Gutta
Clear Gutta (sometimes called 'Outliner') is supplied in jars or tubes.If you buy it in a jar, pour some into a gutta bottle fitted with a metal nib. Most beginners start with tubes, however, as they are very convenient to use. Tubes have a plastic spout for applying the gutta in a fine line.
The gutta needs to penetrate right through to the back of the silk and must be applied in a continuous, unbroken line. Any gaps will allow the colour to escape. Where lines meet, make sure they are properly joined.
Brushes
Soft, round watercolour brushes are best for silk painting. Synthetic sable is good as it is springy for blending and holds plenty of colour.
You will also need:
A watercolour palette or old saucers for mixing colours, 2 jam jars of water, one for diluting colours and damping the silk and the other for rinsing brushes.
Paper towelling for dabbing your brushes on and wiping the gutta tube spout. if you inadvertantly apply too much colour to the silk, use a corner of the towel to absorb the excess.
A 3B pencil for tracing the design onto the silk- keep the pencil lines very light as they will
not wash out of the silk.
A linear design to copy. You can enlarge this Poppy design on a photocopier, or draw your own designs. More experienced painters may like to draw directly onto the silk with gutta.
How to apply Gutta
It is worth practising applying gutta on a spare piece of silk before you begin the project. The trick is to hold the tube (or bottle) at an angle of about 45 degrees, press the end of the spout firmly against the silk and gently squeeze the tube as you draw it across the silk.
New tubes tend to gush out rather freely to start with, so squeeze a little out of the tube onto a piece of absorbent paper until the pressure is even. To avoid blobs, wipe the end of the tube each time before you start a new line and do not squeeze the tube too hard. It takes a little practise to get the speed and pressure right but you will soon master it!
|
Step by Step Project: Painted Silk Poppy
1. Measure and cut the silk to fit the design and frame you are using. Place it over your frame, smoothest side uppermost.
2. Pin the silk to the frame, one side at a time, pulling and tensioning against the opposite side as you pin so it is even and taut.
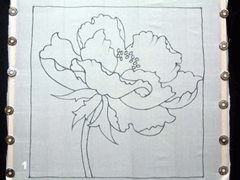
3. Place the design under the silk ( raise it up if necessary with a book) and trace it very lightly onto the silk with a 3B pencil. Remove the design and support.
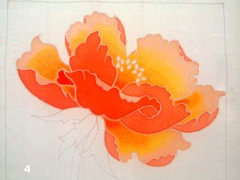
4. Apply the gutta in thin, unbroken lines, following the pencil lines.Check that there are no gaps then leave to dry.
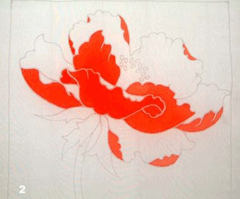
5. Mix red and yellow together in the palette to make a bright orange and paint the undersides of the petals. Apply the paint fairly generously and allow it to spread up to the resist lines on its own.
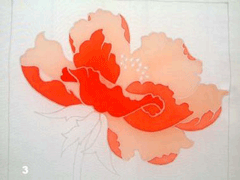
6. Dilute some of the orange with water and paint the insides of the petals.
7. While the silk is still damp (not shiny wet) blend some yellow then a little of the stronger orange into the centre of the poppy at the base of the inside petals.
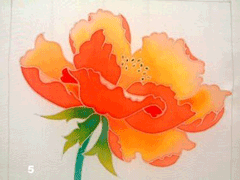
8. Mix 2 or 3 shades of green from yellow and blue and paint the leaves and stem and touch in the stamens with the fine point of the brush.
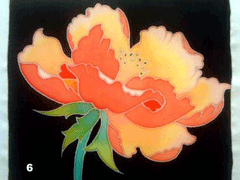
9. Paint the background black and leave to dry completely before unpinning.
Fixing and finishing the finished painting.
Protect your ironing board with a cloth and place the silk face down. Iron it evenly for a few minutes on cotton / silk setting until well heated. This fixes the paints. Water based gutta can then be washed out with warm water. Towel-dry the silk and re-iron it to remove creases.
Painted silks can be used for framed paintings and textile projects. Many framers will stretch and mount the silk painting for you or you can stretch your own pieces onto mounting board before framing, by tensioning and sticking the silk with tabs of masking tape at regular intervals in the same way that you stretched the silk taut when you pinned it to the frame.
Mandy Southan
Author of 'Beginner's Guide to Silk Painting', 'Painting Flowers on Silk', 'Silk Painted Greetings Cards' and 'Flower Designs', all published by Search Press.
Reprinted by kind permission of Leisure Painter magazine - www.leisurepainter.co.uk
|
